Contadina's Blog

Living the contadini life among the olive groves

It’s Moving Day February 12, 2012

Filed under: Uncategorized — contadina @ 10:55 am
Tags: ,

A very short and sweet blog this morning to announce that this blog is moving.


With the help of Jeremy, who has been doing a lot of behind the scenes geekery to update the look of my blog and the wonderful admin team at GrowVeg, who are providing the hosting: I can now perform ad-free blogging and introduce some funky new features.

The address of my blog is now:

http://contadina.growveg.info

This site won’t redirect you to the new site at least for a while, so make sure to change your bookmarks.

Hope to see you all soon.


Lightening the winter burden February 3, 2012

Filed under: Garden,Recipes — contadina @ 4:40 pm

So how was the weather for you yesterday? Did it herald the arrival of spring or was it a sign of a second winter?

February 2nd is Candlemas Day, or Groundhog Day in North America, and marks the midpoint of winter; halfway between the shortest day and the spring equinox, so it’s not hard to figure why it has spawned so much weather-lore around the world.

Known in pre-Christian days as the Festival of Lights; it was a celebration of the increasing strength of the life-giving sun as winter gave way to spring.

Never known to miss a trick for turning pagan festivals into Christian ones, the festival became Candlemas, where a mass was said for the candles to be used by parishioners the following year.

Alternative names for the day are: the Presentation of Christ in the Temple, and Purification of the Blessed Virgin Mary.  I wonder if these hark back to the pagan Imbolc festival, which comes from a term for sheep’s milk, and is a reference to the first milking of the ewes in the spring. Imbolc is a fire festival and also a day of purification and beginnings. February comes from the Latin februare, furthermore, which means to purify and in Roman times February was a time of cleansing and purification.

Although there are slight variations across Europe, Candlemas proverbs pretty much all say the same thing…

If Candlemas be fair and bright,
Winter has another flight.
If Candlemas brings clouds and rain,
Winter will not come again.

The use of animals, most notably groundhogs in North America to predict the arrival of spring or a second winter on February 2ndcan be traced back to ancient Rome. When conquered by Romans, the Teutons picked up on the

Our resident groundhog decides to keep her own council

tradition, and concluded that if the sun made an appearance on Candlemas Day, a hedgehog would cast a shadow, thus predicting six more weeks of bad weather. If no shadow is seen, then spring will come early.

German settlers in Pennsylvania continued the tradition but used a groundhog rather than a hedgehog. Having never met a groundhog I couldn’t say whether the similarities are physical or relate to their hibernation cycles.

Wolves, badgers and bears also feature in many Candlmas celebrations/superstitions, performing much the same task as the groundhog.

At Putignano in Puglia a Bear Festival is held on February 2. If the weather is good, the bear (a costumed actor) builds a haystack to protect himself from the coming bad weather; if the weather is inclement, however the bear can relax because the weather will be good from then on.

Another Puglian take on the use of the natural world to predict the weather on Candelora (as Candlemas is known in Italy) is the laying of eggs. In local dialect, osc’ e a Cannlor e tutt l’ jaddin zeccn all’ov translates as on Candlemas day the hens begin to lay. I found similar old English proverbs refering to geese, with the gist meaning that good geese lay on Candlemas and if they haven’t laid then they won’t until St Valentine’s Day.

Carnival at Putignano

Eggs are a symbol of spring, rebirth, and fertility, which ties in rather nicely with the over-riding theme of all the Christian, pagan and secular celebrations held on February 2nd. In Ireland it is known as Brigit’s Day, in honour of the great Irish Goddess of fertility called Brigit, funnily enough.

With all these thoughts on new beginnings and fertility, we made a pact with a neighbour yesterday to hold a seed swapping party at the end of the fava (broad bean)  season. We’ll hold the Festival of Fave once the beans have dried at the end of May or the beginning of June. Guests will swap any seeds they like, not just fava beans, but the reasoning is that swapping of the same variety with other gardeners will help maintain a healthy stock of seed.

Whilst Tuscans are known as bean-eaters, in Puglia the preferred staples are fava beans and chickpeas. Fave are refereed to as la carne dei poveri, or the meat of the poor. An octogenarian neighbour confirms how important they were to the poor in Puglia as when he was growing up he ate pureed fava beans for breakfast, dinner and tea.

Ncapriata is a puree made from dried peeled fava beans (with or without a potato added), dressed with olive oil and eaten with cooked bitter greens, preferably wild chicory. It’s a Puglian staple and is one of life’s simple pleasures, which definitely helps fill the hungry gap when the garden is less productive.

Everywhere you go in Puglia, people have their own variation on this recipe, but this is the favoured method in Ceglie and the one, which will feature heavily in the Festa di Fave.

First soak your beans overnight and then remove skins before boiling for around half and hour if using a regular saucepan or around eight minutes if using a pressure cooker. The use of a pressure cooker is probably sacrilegious as the dish is generally made in terracotta jugs nestled next to a fire.
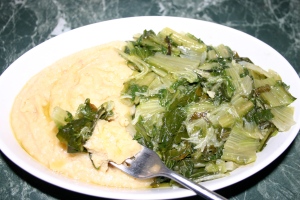
Fava beans and chicory = a taste sensation

Drain the beans and then add some chopped peeled potatoes (a couple of large potatoes for every 500g of dried beans) to the pan before returning the beans. Salt and cover with water (not too much mind as you don’t want a watery mix). Cook until the beans are soft and the potatoes disintegrate. I use a vegetable to mill to puree the mix but you could use a potato masher or ricer or go the traditional route by pummelling it with a large wooden spoon. Season with salt and lashings of Puglian olive oil.

Whilst the beans are cooking you need to wash and cook your wild chicory. If you can’t get hold of wild chicory then any mix of bitter greens, such as dandelion, rocket and chard will do. It takes around 20 minutes to braise or steam the chicory but it’s a good idea to change the water midway though cooking to leave a hint rather than an overpowering bitterness. Alternatively, strain the chicory really well before sautéing with garlic in olive oil.

Serve either side by side on a plate or mix the greens and pureed beans together, just remember to check seasoning and use lashing of good green oil. Embellishments are optional and include red onions marinated in vinegar, bread chunks, fried or pickled green peppers, steamed lampascioni, fried black or green olives, and other condiments.

Puglians really love their fava beans, so in the summertime pureed fava beans often appear with the classic Puglian stewed peppers with onion and tomato dish called pepperonata. The bitterness of the greens and the sweetness of the peppers cut through the creamy/nuttiness of the beans perfectly. So simple and yet so sublime.


A windy start to the year January 7, 2012

Filed under: Garden,Recipes — contadina @ 4:49 pm

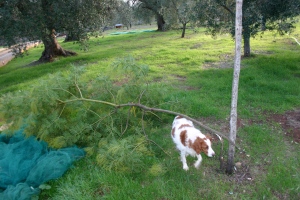
It’s been a pretty wild and windy start to the New Year for us down in the heel. Walking up the lane with the dogs earlier I spotted countless almond and ancient olive trees, which have cracked and lost branches in the strong winds we had yesterday and one olive tree had become completely uprooted.

This highlights the importance of pruning the trees well and regularly feeding them. It could be coincidence, but the damaged trees were either on land regularly poisoned with weedkiller or they were on abandoned land, where the trees are large and unwieldy. Abandoned trees become too dense at the top causing too much wind resistance.

The only damage we suffered was a rather large split in our three-year old mimosa tree. Finger’s crossed though, some rather swift action with some grafting paste, an old rag to bandage the wound and a haircut should save the tree.

Gaia inspects the damage

One the subject of wind, we’re now into the fartichoke….er…artichoke season…

The artichokes, which grow so well here are the best I’ve ever tasted and Carciofo Brindisino (globe artichokes from the Brindisi region) recently received PGI (Protected Geographical Indication) status. Our Christmas visitors from London were astounded by the price of them in the market €2 for 10; apparently it’s more like 2 for 10 in the UK.

For Jane and Jules and anyone else who is interested, here is a little tutorial on preparing artichokes hearts to be used in a variety of recipes.

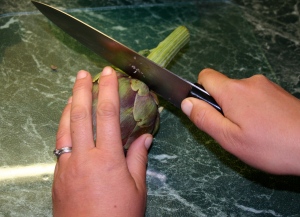
First wash your artichoke, then cut off the stem (you can still eat the stem, but not today we won’t).

Preparing artichoke part 1

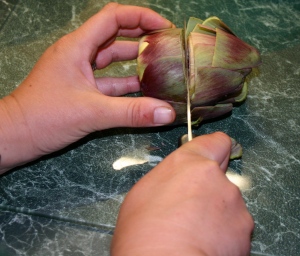
Then cut the artichoke just below the halfway mark (you can cut it a wee bit higher but you run the risk of including inedible stringy bits in your finished dish).

Preparing artichoke part 2

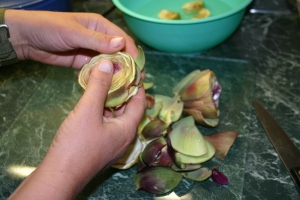
Then break off the tough outer leaves (once again, don’t be shy to take off more than you think as you really don’t want any tough, scratchy bits remaining).

Preparing artichoke part 3

Next cut it into quarters. If there is no hairy heart pop them into water, which contains the juice of half a lemon to stop them turning black.

Preparing artichoke part 4

If there is a hairy choke, cut it out before popping it in the water. Smaller artichokes, when fresh, don’t always have a hairy choke.

Boil enough water to cover the artichoke hearts with the juice of the other half of lemon and pop the artichoke hearts in and boil for a few minutes if you are using small artichokes and about 10 minutes for larger ones.

Drain and leave to cool, before either popping under oil as anti-pasti (great for putting on pizzas and in salads too), dipping in batter and frying tempura style or chopping or using whole in any other recipes.

To serve whole, cut the tough tips of the leaves off with scissors, holding the stalk to keep the artichoke steady. Using a knife, slice the base off, so that it will sit upright, before trimming off the pointed top (the younger the artichoke, the less you’ll need to cut off). Pull the pale centre leaves out, and then scoop the choke out with a spoon, without disturbing the heart underneath.

As before, drop each one in a bowl of water to which lemon juice has been added. Cook them in a pan of boiling salted water for 35-45 minutes (when they’re ready you should easily be able to pull out a leaf). Drain upside down.

To eat pull the leaves off and dip them in hollandaise sauce, garlic mayo, melted butter or garlic butter etc, drawing the leaf through your teeth to remove the tender flesh before discarding the rest.


Buon Natale tutti December 21, 2011

Filed under: Uncategorized — contadina @ 4:45 pm


Just bring me some Figgy pudding November 25, 2011

Filed under: olives,Recipes — contadina @ 12:20 pm

Unbelievably, we managed to get the olive harvest out of the way before the rains, which have caused so much trouble in the north of Italy eventually made their way to the heel. We picked over six quintales (620 kilos to be precise) in just four days, which made 105 litres of lovely oil. That’s a 17% oil return, which we’re really happy about, as the word in the town is that most people are only getting a 13% return this year. There are still plenty of olives left on the trees, so we may do one more pressing when the rains disappear.

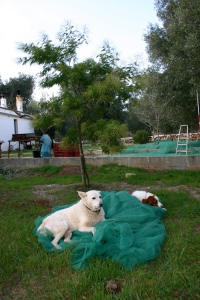
Guarding the nets

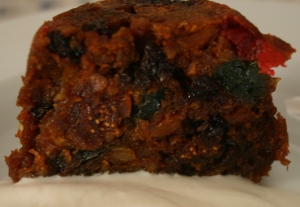
Monsoon-like rain seems a good enough excuse to get in the kitchen as any, so I’ve been preparing a few Christmas goodies. Christmas for us is a mixture of English and Italian, and as we have abundant supplies of both figs and almonds, I always make a figgy pudding. The recipe I use doesn’t need any suet, so it makes for a much lighter pudding, which I prefer. I’ve never been a fan of suet puddings (veggie or not) as I find them too cloying. Using butter makes for a lighter dish and no greasy film left in your mouth. If you don’t have any figs, you could use whatever combination of dried fruit you fancy.


Ingredients

Figgy pudding

8 oz butter
6oz brown sugar
2-3 eggs
4oz plain flour
generous pinch of salt
half-teaspoon nutmeg
half-teaspoon ground ginger
1 and half teaspoon mixed spice
2oz ground almonds
3oz finely grated carrot (or small apple chunks work well)
16 oz dried fruit I used about 8oz figs and a mix of currants sultanas, mixed peel and cherries for the rest
2oz chopped almonds
4oz breadcrumbs
grated rind and juice of one lemon
1tbsp treacle
4 tbsp of water mixed with either rum or brandy
butter for greasing bowl

Grease a two-pint pudding basin. Cream together butter and sugar, then whisk in beaten egg a little at a time. Sift flour, salt and spices on top of the butter mix. Add the remaining ingredients with enough boozy liquid to make a soft mixture, which will fall heavily from a spoon. Mix well. Spoon the mixture into the basin and cover with pleated greaseproof paper and then foil. Tie securely and place in large saucepan. Pour water until half way up sides of the basin. Bring to the boil and cover the pan and simmer gently for 4 hours (or two and half if you are using a pressure cooker). Check water level and top up with boiling water when necessary. Remove the pudding from the pan and store in a cool, dry place. Come Christmas, steam for three hours, or less, if using a pressure cooker, before flaming with brandy.

Luckily I had a generous spoonful leftover, so I made a mini pudding, which we greedily sampled.

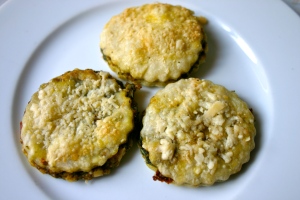
I also experimented with some savoury biscuits to have with cheese over Christmas. They are a bit too rich for that but I reckon they’d be perfect for passing around with drinks.


Pesto biscuits

Pesto biscuits


Ingredients

shortcrust pastry
2 or 3 tbsp pesto (I made regular basil pesto with added sun-dried tomatoes, but I reckon mint pesto would work just as well)
good handful of Parmesan or Pecorino cheese
some extra basil leaves
1 egg
seasoning

While the pastry is resting in the fridge make your pesto. Roll your pastry into a rectangle as thin as you can. Spread pesto all over, but leave about 1cm from the edge. Add some torn basil leaves and most of the cheese. Season and fold in half. Roll as thin as you can (some pesto will escape 🙄 ) and then cut into shapes. Brush milk on top and then scatter the rest of the cheese on top and leave for around 10-mins before popping in a fairly hot oven for around 5-10-mins until they begin to brown and the cheese is bubbling.

Cool on a rack before scoffing with a festive tipple or two. Although these are only made with shortcrust pastry I reckon the oil in the pesto makes them a bit more melt-in-the-mouth.

While on the subject of drinks: no Christmas would be right without a good supply of limoncello, so I’ve got my freshly picked lemons peeled and the rind is currently steeping in a couple of bottles of alcool. They will remain infusing for a week before I strain the lemon peel and mix the lemony-boozy remains with some sugared water. For quantities I find a third of each is about right, providing the perfect kick and sweetness balance.

If you need inspiration to make your own booze and cordials for Christmas I’d thoroughly recommend Booze for Free by Andy Hamilton of self-sufficientish fame. If you pick up a copy now, you can still get some drinks ready before Christmas, alternatively it would make a great Christmas gift for anyone interested in home brewing.

Saluti !!


A cure for bitterness October 28, 2011

Filed under: olives,Recipes — contadina @ 1:57 pm

Last year I tried three different olive curing methods – lye, brine and brine and bruise, and ever keen to experiment, I’m trying four different methods this year to discover the table olive taste that I like best.

First, a few notes on last year’s olives. I’ve decided, after trying it quite a few years in a row, that I’m not a big fan of lye-curing. This seems to be the most popular method in Puglia as it’s both quick and effective. It works so effectively though that I can’t really taste the olives, although it does smell wonderfully Christmassy.

To be honest, I didn’t really see a great difference in the two brine-curing methods. They both tasted good and kept us in olives for the year, but they were, perhaps a little too salty for my taste (even after several water changes). It’s quite a balancing act between getting rid of the bitter oleuripenals, to reveal the taste of the fruit and not making them taste too salty.

Now, onto this year’s quest to find the perfect table olive, choosing several methods from the multitude, which have developed in olive-growing nations around the world.

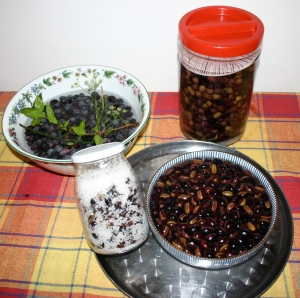
Starting clockwise from the small jar...dry cure, water method 3, 1 and 2

Dry cure method
This is one of the more basic curing methods and just involves covering the olives in rock salt. Traditionally this would have been done in a hessian sack, basket or wooden box in which you cover the olives in salt and wait for the bitter juices to leak out. By shaking daily and adding a little more salt every few days the olives should be cured in around three or four weeks.

I’ve tried the same method in a glass jar. Alternate layers of olives with course rock salt and shake every day for three weeks, adding more salt to absorb juices. Once cured sufficiently, rinse, add warm water and 4 tablespoons of red wine vinegar to cover and top with a layer of olive oil. They will be ready to eat after 4-5 days. You can also store these in olive oil after you have rinsed the salt off after leaving them to drain until they are dry, so maybe I’ll try both methods when they are ready.

Water method 1
Cleaned olives are placed in a non-reactive bowl (terracotta, ceramic or glass) and covered in water. The water is changed daily for 10 days before the olives are jarred and covered in a brine solution (1 part salt to 10 parts water) until they are cured of their bitterness. As I glaze over at the mere mention of numbers, I used the floating egg method again (place your olives in jars and cover with sufficient water to allow you to pop something over them to ensure they remain submerged, strain the olives but keep adding salt to the water until an egg will float in it). I’ll change the brine solution when I remember (hopefully once a month) until they are ready.

Water method 2
Make a vertical cut or two down each olive using a sharp knife or prick them with a cocktail stick and place them in a brine solution (see above). Cover the bowl, ensuring that the olives are submerged.

Shake the bowl daily, changing the brine solution once a week. Start tasting olives for bitterness after week three but continue until necessary.

Once they taste good, remove the olives from the old brine. Make a new batch of brine, and fill jars with it. Put the olives in the jars, and top off the jars with four tablespoons red wine vinegar, and a tablespoon or so of olive oil. They should keep for a very long time if properly stored.

As a bonus, I’m hoping to use some of this solution to make dirty martinis with over the festive season. ☺

Water method 3
I’m using Fasole (or Pasole as they are known locally) olives for this method as they are little sweeter than other varieties so should cure slightly quicker (one month, rather than three) For every kilo of black olives use around 30g of salt. Place the olives in a container with the salt, and cover them with water and some sprigs of wild fennel and blueberry. Cover the pan (ensuring the olives are submerged) for one-three months changing the water every fortnight.

Olive Fritte

They may not look much, but trust me they taste divine

No-cure olives
Luckily for impatient olive-loving souls, such as myself, Puglia is famous for two even sweeter varieties of olives, which can be eaten without curing. Both Nolche, which are ready in September and Amelie, which are ready in October are sautéed, either on their own with salt or with any combination of garlic, chilli and chopped tomatoes. The salt helps rid the olives of any bitterness, but I prefer to fry them with garlic and tomatoes as well.

Just heat some olive oil in pan, add olives, salt and whatever else you wish and fry until the olives soften. These really are a taste sensation so if you ever get a chance to try some then I heartily recommend that you do. Each bite involves a burst of bitter/sweetness, which is quite heavenly. A friend told me you can even buy these olives in trendy London markets nowadays, so keep you eyes peeled for fresh sweet olives for sale.

So there you have my tale of bringing olives to the table. I’ll keep you posted on successes and failures.  In the meantime, we’ll be starting our olive harvest to make oil shortly as the olive mills open for the first time next week, so think nice weather thoughts everyone.

* An important note for all methods, which require that olives be submerged in liquid, place a weight on top of the olives to ensure that all the olives are submerged. I use plates when they are in a bowl and cut the bottoms off ricotta moulds to keep the under water when in jars.


The art of dangerous jam and making molasses October 4, 2011

Filed under: Recipes — contadina @ 1:45 pm

Sorry for the long hiatus since my last blog, but my time has been mostly filled with deadlines and dentists. In my absence Autumn has arrived, covering the land with a lush green carpet and beckoning us out into the garden.    It always amazes me how after, just 36-hours of rain, colour returns replacing the red, arid summer landscape.

I think autumn in southern Italy feels much like spring in Northern Europe. Instead of warming up a little, however a temperature drop a few degrees and the arrival of rain, signals an awakening of a dormant land and a reinvigoration of the soul.

As well as grass and flowers popping up everywhere, the chicks we got back in May have gone into full-on egg production, while the dogs have forsaken their nocturnal summer ways in favour of daytime exploring, hunting and playing and evenings spent snoring on the sofa.

Invigorated we’ve got most our winter crops planted and have gathered the last fruit and nuts before the olive harvest begins again next month. We had such a good crop of almonds this year that I swapped a couple of bags full for some walnuts.  Both Jeremy and myself look like we’ve been fingerprinted, but our black fingertips are the result of getting walnuts from their husks rather than a visit to the carabinieri. Honest guv!

Prickly pear and pomegranate

It’s also time for harvesting some of our more exotic, but fiddly fruit. I like the taste of both prickly pears and pomegranates and was determined, despite their trickiness to harvest and prepare, to find ways to preserve them this year.

Italians generally eat chilled raw prickly pears, or fichi d’India (Indian figs) as they are called here, after dinner. Whilst I like the taste, which is somewhere between a kiwi and a raspberry, I really can’t be bothered with the bullet-like pips each fruit contains.

To get round this I usually just shove them in the juicer and it makes for a rather nice drink, which lends itself to cocktail making.

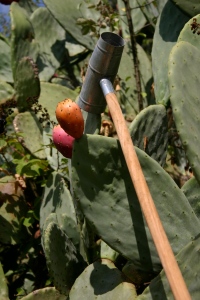
Behold, the mighty prickly pear picker

Before you can start juicing, however you need to pick your prickly pears and de-spine them, hopefully, without spiking yourself. I’ve got a wonderful prickly pear picker.  It’s simple, yet effective and only cost a couple of Euros. Attached to a long pole I place it over the fruit, before turning it to one side to twist a prickly pear off.  You can just use kitchen tongs but as our prickly pears are rather high up, I rather like the added protection the pole provides.

Prickly pears deserve their name as both the plant and fruit are covered in tiny hair-like spines that irritate the skin and are really difficult to remove. I’ve tried soaking them in water and pouring running water over them to remove the spines, but there are always a sneaky few that end up in between my fingers to drive me insane.

I thought I’d try the Native American approach this time though and use fire to get rid of the spines. Instead of a campfire, I held them over a camping stove and for the first time ever I managed to remain spine-free.
Prickly pear jelly
To make prickly pear jelly quarter the fruits and cover them with a little water and cook for around 10-minutes to soften them. Then crush the fruit with a potato masher before straining them between two layers of muslin. This may seem excessive but a neighbour got a spine in his mouth a couple of years back and it became so swollen and sore that he could only consume liquid food for a couple of weeks.

Pour 4 cups of prickly pear juice (around 2 kilos of fruit) and add half a cup of lemon juice. Mix a cup of sugar with some pectin and add to the juice. Bring to the boil and then add two more cups of sugar and bring back to a full boil. Boil for one minute stirring continuously before pouring into sterilised jars. It’s a little on the sweet side but it has a rather delicate and interesting flavour.

While I love the idea of cactus cooking, I’ve not felt brave enough to try the pads (nopalitos) yet although they are a popular green in Mexico. Apparently they taste like green beans but with the texture of okra. An Italian friend tried them a few years back and she confirmed that they were a bit on the slimy side.

Pomegranate molasses
Pomegranates are definitely more pippy than slimy, but sadly only available for a short period, so this year I’ve decide to freeze some pips and to make pomegranate molasses. To freeze, quarter the fruit and hold them over a bowl to get the pips out. Spread the pips on a baking tray and flash freeze. When frozen bag them up to use on salads throughout the year.

I also juiced some pips to drink, which you could also freeze. To make the molasses you need to use bitter pomegranates, which we have plenty of, although only the chickens have enjoyed them up till now.

Once juiced, pour four cups of pomegranate juice, half a cup of sugar and a tablespoon of lemon juice into a pan and stir until the sugar has dissolved. Keep on a medium to low heat until it has reduced to around one cup’s worth of liquid (around 70 mins) or the consistency of thick syrup. Bottle and store in the fridge.

It’s wonderfully tangy and I’m really looking to cooking with it, as I’m a big fan of Middle Eastern food. It can be added to drinks (grenadine should be made with pomegranate syrup), marinades (for meat, fish and veg), salad dressings, soups, stews and rice based dishes.

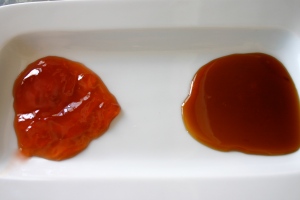
Prickly pear jelly to the left and pomegranate molasses on the right

If you don’t have any pomegranate trees but fancy the sound of molasses then buy yourself some juice and get molassing.


Pasta pronto – meals in minutes August 27, 2011

Filed under: Recipes — contadina @ 9:11 am

Italy: the home of slow food is also home to the ultimate fast food: namely, pasta. A satisfying plate of pasta can be faster, easier, and tastier than a takeaway and it will probably be a lot healthier too. All of the recipes listed below, as requested by our army of helpxchangers, take no longer than it takes to cook the pasta itself; and if you can boil water you can cook pasta. Buon Appetito !!

Pasta alla Crudaiola (pasta with raw tomatoes)

Crudaiola - the taste of summer

This is a light and refreshing pasta dish, perfect for hot summer days. The one thing crudaiola dishes have in common is uncooked tomatoes but other than that you can use your imagination. I marinated half a cup of olive oil with a couple of chopped garlic cloves, some chopped toms and splash of balsamic vinegar with some basil and salt and then tossed some just cooked penne (although any short pasta will do)  in the mix and put some grated cacioricotta (salty semi-hard cheese made with sheep and goats milk) on top. You could use any other cheese (fresh mozzarella would be good) or leave the cheese off, add capers, oregano, rocket, tuna etc etc.

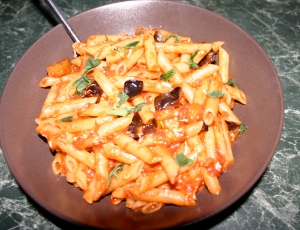
Pasta alla Norma (aubergines in tomato sauce)

Sicilian perfection

This would probably push my 11-minute time limit, if I didn’t have a supply of ready roasted aubergines to hand. Whenever the oven is on I usually roast some diced aubergines to be used in dishes such as this, but you could just fry the chunks.

Put a pan of water on to boil and either fry or use ready roasted chunks of aubergines (one-cm cubes) with a chopped garlic clove and chilli. When the aubergines cubes have browned add passata or tomato sauce. When the water is boiling add salt and then add penne. When the pasta is cooked, drain and add some cacioricotta (or another cheese if you can’t get hold of it) mix and then pour over the sauce and mix well, with some basil before serving.

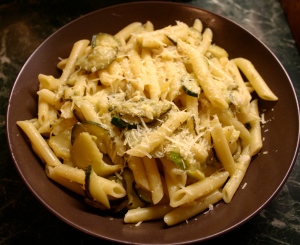
Courgette and lemon pasta

Courgette and lemon pasta

Pasta of your choice (penne or farfalle are good)
Three or four zucchini for two people
Garlic clove or two
Juice and zest of one lemon (you may find this too lemony, so go for half first and dips a bit of pasta in to taste before adding anymore
Good helping of pecorino or parmesan
Good splash of olive oil
Seasoning

Whilst boiling water for pasta, cut zucchine in half lengthways then thinly slice the whole way down, so you have lots of little crescents. Heat olive and add garlic and zucchini with a sprinkle of salt to the pan. You may want to do the zucchini in batches, depending on how many you are cooking for, but you want them softened rather than coloured. Keep stirring, to ensure all the zucchini are cooked. They should be ready when your pasta is. Add the lemon juice and seasoning and stir and then add the strained pasta on the top. Before mixing, add the cheese on top of the pasta and then mix everything up ensuring that the pasta is coated with everything.

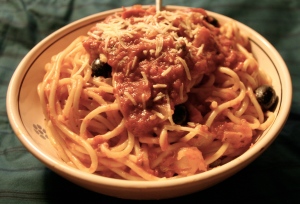
Pasta alla Puttanesca

Pasta alla Puttanesca

Ingredients
good sized onion
garlic clove
chilli (fresh or dried)
anchovy fillet (I don’t use it but if you want to be authentic go ahead)
olive oil
pasta (usually spaghetti but penne also works well)
tomato (sauce, passata or fresh)
capers and black olives (as many as you like)
pecorino or parmesan cheese
herbs (oregano, parsley or basil)

Sweat onions, garlic and chilli in oil. If using anchovies cook this also until they go mushy. Then add tomatoes and simmer until reduced. When sauce is a good consistency add capers, olives and seasoning. Mix cheese with cooked pasta then mix with most of the sauce reserving a little to pout over each bowl of pasta and some more cheese if you want.

Pasta with spinach, mushrooms and sun-dried toms

This is my version of a meal I once had at Terre à Terre in Brighton – if you’ve not been and want to treat yourself to some amazing vegetarian food, I’d thoroughly recommend it.
I have recreated this dish several times using fresh parpadalle (any wide thin pasta would work well), mixed wild mushrooms, garlic, sun-dried tomatoes, spinach and pine nuts but last night I changed the spinach for beetroot leaves, button for wild mushrooms, walnut instead of pine and I used dried spaghetti but it still worked pretty well.
Sweat mushrooms and garlic, until tender…don’t overdo it. Add leaves and cook until wilted. Add sun-dried tomatoes, seasoning and nuts. Mix with cooked pasta and add more olive oil if required.

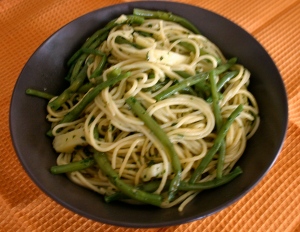
Pasta alla Genovese

I mentioned fagiolini con pomodoro e cacioricotta the other week but another French bean dish, which is quick and easy and utterly delicious is pasta alla Genovese. As the name suggests this dish involves pesto…the ultimate fast food pasta sauce.

To make, boil water in a really large pan and then top and tail some french beans and peel a couple of potatoes before slicing them into batons of a similar size to the beans. When the water is boiled add linguine, beans and potatoes. Whilst everything is cooking make some pesto using just basil, garlic, oil, cheese and seasoning. When the pasta is cooked, drain and stir in the pesto.

Pasta alla boscaiola (mushroom, cream and tomato pasta)

Boscaiola, means from the woods, and can refer to any dish, which contains mushrooms: most often pizza and pasta. Recipes vary greatly – some are just mushroom-based whereas other include tomato and others tomato and cream. This is my attempt to recreate the version served up at a local osteria.

Pasta of your choice (I tend to use penne, but parpadalle works well too)
3 tbs olive oil
handful of fresh or frozen peas
knob of butter
1 onion
splash of red wine
150 ml of cream
500g sliced mixed mushrooms
1 can of toms or passata
Seasoning
Fresh parsley

Heat the oil, add the onions and cook over moderate heat until wilted. Add the mushrooms and butter and cook for a few minutes. Add the tomatoes and a splash of red wine and simmer gently until thick. Add peas after about six minutes and add the cream to the sauce when the pasta is ready. Season with salt and pepper and stir the sauce off the heat to ensure the cream gets mixed well. Add cooked pasta to the sauce (whatever variety you fancy) and parsley. Mix well and serve. For a non-vegetarian variety you could fry off some smoked pancetta cubes before adding the onions.

Risi e bisi, is so called because it uses small pasta shapes that are rice shaped, although any small pasta shapes will do. In our house it’s called cheesy peasy pasta and is a really good comfort food.  Fry an onion, add peas, pasta shapes and stock and cook over low heat until cooked. Keep stirring from time to time and add more stock if necessary. When the pasta is cooked add cheese mix well.

I guess that spaghetti con aglio, olio and peperoncino is the ultimate easy pasta…just heat oil and add a couple of thinly sliced garlic and a thinly sliced chilli and heat over a low heat until the garlic is golden brown. Add salt and remove from the heat before adding parsley. Drain cooked pasta and toss with the garlic and chilli oil and serve either with or without cheese.

Other pasta pronto dishes include many that have flavoured tomato sauces. These include penne arrabbiata (garlic and chilli providing the oomph) spaghetti all ‘amatriciana (heat some diced pancetta before adding onions and tomato sauce for a slightly smokey sauce) or add anchovies for a full on fishy-flavoured sauce.

These are our favourite fifteen-minute pasta dishes. What are yours?


Pickled in Puglia August 6, 2011

Filed under: Pergola,Recipes — contadina @ 7:18 am

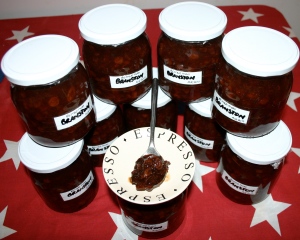
As promised, here is the recipe for the “better than Branston chutney”. If you like this spicey style of dark chutney with a good good mix of fruit and spice, I promise you’ll never buy another jar of Branston again. I doubled up the ingredients listed below to make 10 decent sized jars.

I can't believe it's not Branston

Ingredients
3 lb purple plums (damsons would work just as well)
2 heaped teaspoons ground ginger
2 small cinnamon sticks
1 oz allspice berries (I didn’t have any, so put 1.5 tsp of ground allspice in)
1 dessert spoon of cloves
2 pints malt vinegar (I used a mix of white wine and red wine vinegars and balsamic)
1 lb cooking apples
3 large onions
3 cloves garlic
1 lb seedless raisins (I used sultanas)
1 lb soft brown sugar I’ve seen similar recipes, which add another 1lb of sugar, but I think chutney shouldn’t be overly sweet – it needs a bit of sweet and sour!
2 tablespoons sea salt

De-stone plums and put fruit in a big pan. Core the apples but leave the peel on, and finely chop them by hand or in a processor. Then process the onions. Add both to the pan. Crush the garlic and add that, followed by the ginger, raisins, sugar, salt and the vinegar. Stir thoroughly. Wrap the cinnamon, allspice (if using whole) and cloves in muslin and pop in the pan.

Bring everything to the boil, then lower the heat and let the chutney simmer very gently for 2-3 hours, stirring occasionally, but more often towards the end to prevent it sticking to the bottom. When almost all the vinegar has disappeared and the chutney has thickened pour it into the hot, sterilised jars. Cover each with a waxed disc and seal tightly.

Leave for at least a couple of months, but the longer you leave it, the more chance the flavours have to mellow and mingle. It’s a shame we finished the final jar of last year’s chutney a couple of weeks ago as I’d have been able to show you how dark it gets. I also introduced a new taste sensation to our merry band of helpers who now enjoy the sublime combination of chutney with houmous.

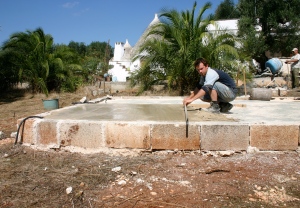
Elsewhere, the screed has been laid for the new pergola and we’ve had two large pallets of stone slabs or chianche de Trani delivered. We cemented some rebar into the floor to be used to form legs for a 3-metre long stone banqueting table. I know it’s not very green to build a cement floor but we did, at least get to reuse  old blocks to create the form and got rid of a mountain of old flooring rubble. You see chianche floors in many trullis and courtyards as well as roads in the old parts of towns.

Jamie ensures there is a level playing field

From my limited research it seems that limestone flooring in Puglia has been popular since at least the Middle Ages.

If you click on the photo, you’ll see some of the chestnut poles we will use to build the pergola structure with. We get them from a guy who copices a 7-hectare chestnut wood in Calabria. He can supply poles of almost any dimension, so we also picked up some thinner ones to be used to make an outdoor shower cubicle with.

The fencing also comes up to the house now, so the dogs are just getting used to not being able to run over to next door’s to chase birds.


Pergola and pomodori – many hands make light work July 30, 2011

Filed under: Garden,Pergola,Recipes — contadina @ 6:53 am

Just a quick update, as I’ve been too busy to blog. Some cooler weather has meant that, with the help of our current helpxchangers, we’ve managed to get quite a lot done.

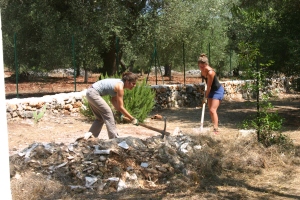
The girls soon move our rubble mountain

Breaking rocks in the hot sun

First off Amy arrived and she spent a week helping Jeremy cement posts and the top of the wall, which comes up to the house. She’s also been great helping around the house and helped me jar some more passata.

Then Jamie and Carlena arrived and together with Amy they managed to move our mountain of rubble (from when we had to dig up and relay a couple of floors) to become the hardcore base of our new pergola floor.

Jamie and Jeremy then had fun smashing all the rubble and found that compacting it with our roller-assisted rotavator (gas bottles filled with water) worked a treat. Next week they’ll lay the screed and it’s big enough for a table to sit twelve and a decent dance floor.

You put this here for us right?

The first sand delivery to lay the pergola screed

The girls meanwhile made our final batch of passata – bringing the grand total up to 140 bottles to keep us going throughout the year.

Each time I make passata there is slightly more than my giant water-bath will hold, so I’ve also made tomato ketchup and tomato concentrate.

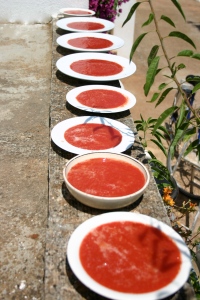
estratto drying on the trullo roof

Tomato flavours intensify in the sun

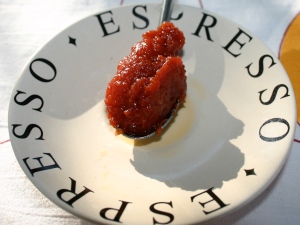
Sun-reduced concentrato as it’s called in Puglia or estratto di pomodoro, as it’s known in Sciliy,  is so rich in intense flavour and colour that it puts any shop bought tomato concentrate to shame. To make, just pour passata into shallow dishes and cover with sea salt. It’s traditional to spread it out on wooden boards, but shallow dishes are easier to clean. Leave out in the sun each day and remember to bring in each evening. Keep stirring it to help the sun dry the paste faster. In our last heatwave it only took me two days to make estratto. Once it has become a deep, dark red colour and taken on the consistency of clay fill small jars with it and cover with olive oil. The jars will keep for a year but store in the fridge once opened, always covering with a layer of oil.

We’ve another heatwave on the way so I’ll sun-dry some tomatoes to store dried and under oil, and so complete this year’s tomato odyssey.

store under oil and liven up your sauces and soups

After two days this is the result

I’ll be making some “it’s much better than Branston” chutney today with our purple plums so remember to tune in next week for the recipe as it’s seriously good (I’ve got quite a few Italian’s hooked on it).